Etching socket tools is a practical and creative way to customize, label, or brand metal sockets for identification or aesthetic purposes. This guide explores various etching methods, safety precautions, and step-by-step instructions to achieve professional results.
1. Introduction to Etching Socket Tools
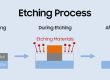
Socket tools, typically made of chrome vanadium steel or alloy steel, are used with ratchets to fasten or loosen bolts. Etching involves removing material from the surface to create permanent markings. Common applications include:
- Size labeling for quick identification.
- Custom designs for personalization.
- Brand logos for professional toolkits.
2. Etching Methods
Three primary methods are used for etching metals:
A. Chemical Etching
Ideal for DIYers, this method uses acid to dissolve exposed metal.
Materials Needed:
- Etchant: Ferric chloride (most common), nitric acid, or hydrochloric acid (diluted).
- Resist Material: Nail polish, vinyl stickers, or photoresist film.
- Safety Gear: Nitrile gloves, goggles, apron, and ventilation.
- Other Supplies: Cleaning solvents (acetone), applicator brush, plastic/glass container, neutralizing agent (baking soda + water).
Steps:
- Clean the Socket: Degrease with acetone to remove oils.
- Apply Resist:
- Use vinyl cut with a design (e.g., size labels) or hand-draw with nail polish.
- Ensure edges are sealed to prevent acid seepage.
- Etch the Metal :
- Submerge the socket in ferric chloride or brush the etchant onto exposed areas.
- Agitate gently. Etching time varies ( 5–30 minutes).
- Neutralize and Clean:
- Rinse with water, then apply a baking soda solution to neutralize acid.
- Remove resist with acetone.
- Protect the Surface: Apply clear coat or oil to prevent rust.
Pros: Low cost, accessible materials.
Cons: Hazardous chemicals, requires ventilation.
B. Electrochemical Etching
Uses electricity and electrolyte solution for safer, controlled etching.
Materials Needed:
- Power Supply: 12–24V DC (battery or adapter).
- Electrolyte : Saltwater or commercial etching solution.
- Stencil: Vinyl or pre-made metal stencils.
- Conductive Pad: Cotton soaked in electrolyte.
Steps:
- Prepare the Socket: Clean and attach the stencil.
- Set Up the Circuit:
- Connect the socket (anode) to the power supply’s positive terminal.
- Attach a conductive pad (cathode) to the negative terminal.
- Etch:
- Soak the pad in electrolyte and rub over the stencil.
- Apply power for 10–60 seconds. Repeat for deeper marks.
- Clean and Protect: Rinse and apply anti-corrosion coating.
Pros: Safer, no strong acids.
Cons: Requires stencils and power supply.
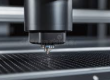
C. Laser Etching
Professional method using a fiber laser for precision.
Process:
- A laser beam vaporizes the metal surface to create markings.
- Ideal for industrial use due to high equipment costs.
Pros: Permanent, high-resolution marks.
Cons: Expensive machinery.
3. Safety Considerations
- Ventilation: Always etch in a well-ventilated area.
- Protective Gear: Wear gloves and goggles when handling chemicals.
- Disposal: Neutralize acids with baking soda before disposal.
4. Post-Etching Care
- Remove Residue: Clean with isopropyl alcohol.
- Rust Prevention: Apply a clear enamel spray or tool oil.
- Inspect: Ensure etching depth doesn’t compromise structural integrity.
5. Troubleshooting Common Issues
- Uneven Etching: Caused by poor resist adhesion. Re-clean and reapply resist.
- Faint Marks: Increase etching time or etchant concentration.
- Over-Etching: Monitor progress closely; avoid leaving in acid too long.
6. Conclusion
Etching socket tools is a versatile skill for hobbyists and professionals. Chemical etching offers affordability, while electrochemical methods provide safety. Always prioritize safety and test techniques on scrap metal first. With practice, you can achieve durable, professional-grade markings tailored to your needs.
Final Tips:
- Start with simple designs (e.g., size numbers) before attempting intricate artwork.
- For chrome-plated sockets, etch cautiously to avoid penetrating the protective layer.
- Explore commercial etching kits for beginner-friendly setups.
By mastering these techniques, you can transform ordinary sockets into personalized, functional tools.

- Etching Cost Calculator - June 14, 2026
- Surface Area Calculator - May 24, 2026
- Etch Rate Calculator - May 24, 2026