Etching a stainless steel tumbler allows you to personalize it with intricate designs, logos, or text. This process involves removing layers of metal to create permanent markings. Below is a detailed, step-by-step guide to achieve professional results safely and effectively.
Materials Needed
Stainless Steel Tumbler: Ensure it’s clean and free of coatings (e.g., powder-coated tumblers may require sanding).
Etching Method Options:
Chemical Etching: Ferric chloride, saltwater electrolysis setup, or vinegar-based solutions.
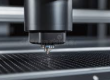
Laser Engraving: Fiber laser (preferred for metal) or CO2 laser (limited effectiveness).
Stencil Materials:
Adhesive vinyl (e.g., Oracle 651/Cricuit Permanent Vinyl).
Transfer tape, craft cutter (e.g., Cricut/Silhouette), or pre-made stencils.
Safety Gear: Nitrile gloves, goggles, apron, and a respirator (for chemical methods).
Tools: Scissors, squeegee, cotton swabs, plastic container, baking soda (for neutralization).
Surface Prep: Sandpaper (220–400 grit), rubbing alcohol/acetone, lint-free cloth.
Post-Etching: Clear coat spray, polishing tools (optional).
Preparation Steps
1. Design Your Stencil
Use graphic design software (e.g., Cricut Design Space, Adobe Illustrator) to create or upload your design.
Cut the design into adhesive vinyl using a craft cutter. For curved tumblers, segment the design for easier application.
2. Prepare the Tumbler
Sand the Surface (if coated): Use 220–400 grit sandpaper to remove any protective coating.
Clean Thoroughly: Wipe with acetone or rubbing alcohol to eliminate oils and debris.
3. Apply the Stencil
Use transfer tape to position the vinyl stencil on the tumbler.
Burnish edges with a squeegee to prevent solution seepage. Double-check for air bubbles.
Chemical Etching Method
1. Set Up a Safe Workspace
Work in a well-ventilated area (outdoors or under a fume hood).
Wear gloves, goggles, and a respirator.
2. Apply Etching Solution
Ferric Chloride: Soak a cotton ball in the solution and dab it onto the exposed design.
Saltwater Electrolysis: Submerge the tumbler in a saltwater bath connected to a low-voltage power supply (5–12V). Use stainless steel as the anode.
Agitate: Gently swirl the solution every 5 minutes for even etching.
3. Etching Time
Ferric Chloride: 15–30 minutes (adjust for desired depth).
Saltwater Electrolysis: 10–20 minutes.
4. Neutralize and Clean
Rinse with water, then soak in a baking soda solution (1 tbsp per cup of water) to neutralize acids.
Peel off the stencil and scrub with soapy water to remove residue.
Laser Engraving Method
Test Settings: Use scrap stainless steel to calibrate power (e.g., 20–30% power for fiber lasers).
Engrave: Secure the tumbler in a rotary attachment for even marking.
Post-Process: Clean with alcohol to remove oxidation or debris.
Post-Etching Finishing
Polish: Use a Dremel with a buffing wheel to smooth edges or create contrast.
Protective Coating: Apply food-safe clear coat (e.g., ProtectaClear) to preserve the design.
Troubleshooting
Faint Design: Increase etching time or reapply the solution.
Bleeding Under Stencil: Ensure stencil adhesion by burnishing edges thoroughly.
Discoloration: Passivate the tumbler with citric acid (5% solution) to restore corrosion resistance.
Safety Tips
Dispose of chemicals per local regulations (ferric chloride is hazardous waste).
Avoid inhaling fumes; use a respirator rated for acid vapors.
Protect the tumbler’s interior with tape or a liner during etching.
Creative Tips
Start with simple designs (e.g., monograms) before attempting complex patterns.
Use a mix of etching and paint fill for colorful accents.
Practice on scrap metal or inexpensive tumblers to refine your technique.
By following these steps, you can transform a plain stainless steel tumbler into a personalized work of art. Whether using chemical solutions or a laser engraver, prioritize safety and precision for the best results.

- Top 6 Metal Engraving Factories In Vietnam (In-Depth Analysis 2025) - September 17, 2025
- Top 8 Metal Engraving Factories In Japan (In-Depth Analysis 2025) - September 9, 2025
- Top 8 Metal Engraving Factories In France (In-Depth Analysis 2025) - September 2, 2025